


Monday, March 11, 2013
Reset Your Forgotten Windows Login Password
Posted by K. Ezhil Kumar | Monday, March 11, 2013 | Category:
|
0
comments


Tuesday, August 21, 2012
Sunday, September 25, 2011
Question & Answers
Posted by K. Ezhil Kumar | Sunday, September 25, 2011 | Category:
Question Answers
|
0
comments
1.Difference B/W NTFS & FAT32?
NTFS stands for New Technology File System.
NTFS allows we can create a volume up to 16TB (terabytes) using the default cluster size 4KB and NTFS allows we can create a volume up to 256TB using the cluster size of 64KB,
Minimum volume size approximately 10MB.
NTFS allows set permission on a file or folder and we can specify the users or group who can restrict or allow and select the specify type of access.
NTFS allows create disk quota limits, supports compression, file and folder encryption is available. NTFS cannot support Floppy’s.
FAT 32 stands for File Allocation Table 32 partition size minimum 512MB to maximum 2TB and maximum file size 4GB. FAT32 supports Floppy drives. File and folder encryption is not possible
2. What is forest?
Forest is one or more Trees these trees share common configuration, schema information and automatic trust relationship between trees and domains with in a forest.
3. What is Tree?
More than one domain.
example: parent domains and child domains.
4. What is Domain?
Active directory domain is a collection of computers that share common databases and alsos share common security policies with other domains.
Active directory domain is a set of network resources (computers, printers, applicaions so for) for a gruop of users, The user log in to the domain then only they can access the resources.
5. What is Domain controller?
Domain controller is a server that is responsible for allowing host access to Windows domain resources.
Domain controllers used to individual login and get the authentication from the domain controller, location for the domain and all the database information for the domain its replicated each and every domain controllers.
Saturday, November 20, 2010
Windows vista parental controls
Posted by K. Ezhil Kumar | Saturday, November 20, 2010 | Category:
Windows Vista
|
0
comments
Go to Control panel and select setup parental controls to any user

Select which user you want to control.


Select which user you want to control.
Configure the parental controls for your computer and applications, setting appropriate limits on your children's game playing, web browsing, and overall computer use. You can also turn parental controls on and off; block or allow specific programs, games, and websites; and set controls for every aspect of your child's computer use. Third-party family safety software and services providers may also choose to have their products and services accessible from the Parental Controls panel in Windows Vista.
Parental Controls does not work on domain-joined machines, such as in a business environment.
This feature is included in the following editions of Windows Vista:
Windows Vista Home Basic, Home Premium, Ultimate
Web restrictions. You can restrict the websites
Time limits:
Games
Allow or block specific programs
http://kezhil.wordpress.com

Restrict Specify Applications for Current User
Goto Start - Run - regedit
expand this key
HKEY_CURRENT_USER\Software\Microsoft\Windows\CurrentVersion\Policies\Explorer and create "DisallowRun" (dword value) and give the value "1", after create a sub key name "DisallowRun" in "Explorer" key then open DisallowRun key create string value name "1" value date "Notepad.exe". If you want more applications restrictions give the sequence numbers for value name and give the applications exe name in value data.
For example you want to restrict Notepad and Adobe Acrobat Reader
HKEY_CURRENT_USER\Software\Microsoft\Windows\CurrentVersion\Policies\Explorer
Value Name : DisallowRun
Value Type : Dword value
Value Data : 1
HKEY_CURRENT_USER\Software\Microsoft\Windows\CurrentVersion\Policies\Explorer\Disallow Run
Value Name : 1
Value Type : String Value
Value Data: notepad.exe
Value Name : 2
Value Type : String Value
Value Data: AcroRd32.exe
****************************************************************
Control Panel Restrictions for Current Users
Remove control panel in Start menu, Explorer and restrict Run command
HKEY_CURRENT_USER\Software\Microsoft\Windows\CurrentVersion\Policies\Explorer
Value Name : NoControlPanel
Value Type : Dword Value
Value Data: 1 (value data: 0 restore control panel)
****************************************************************
Restrict My Computer properties and Control Panel "System"
HKEY_CURRENT_USER\Software\Microsoft\Windows\CurrentVersion\Policies\Explorer
Value Name : NoPropertiesMyComputer
Value Type : Dword Value
value Data: 1 (value data: 0 to reset)
****************************************************************
Remove Add Printer & Delete Printer options
Add Printer
HKEY_CURRENT_USER\Software\Microsoft\Windows\CurrentVersion\Policies\Explorer
Value Name : NoAddPrinter
Value Type : Dword Value
Value Data: 1 (value data: 0 to reset)
Delete Printer
HKEY_CURRENT_USER\Software\Microsoft\Windows\CurrentVersion\Policies\Explorer
Value Name : NoDeletePrinter
Value Type : Dword Value
Value Data: 1 (value data: 0 to reset)
****************************************************************
Restirct Folder Options in Control Panel & Tolls menu
HKEY_CURRENT_USER\Software\Microsoft\Windows\CurrentVersion\Policies\Explorer
Value Name : NoFolderOptions
Value Type : Dword Value
Value Data: 1 (value data: 0 to reset)
****************************************************************
Hide Control Panel Applets
(This setting only hide this options in control panel)
Goto Start - Run - regedit
expand this key HKEY_CURRENT_USER\Software\Microsoft\Windows\CurrentVersion\Policies\Explorer and create "DisallowCpl" (dword value) and give the value "1", after create a sub key name "DisallowCpl" in "Explorer" key then open DisallowCpl key create string value name "1" value date "access.cpl". If you want hide more applets give the sequence numbers for value name and give the applets cpl in value data.
For example you want to hide Add Hardware and Add or Remove Programs
HKEY_CURRENT_USER\Software\Microsoft\Windows\CurrentVersion\Policies\Explorer
Value Name : DisallowCpl
Value Type : Dword value
Value Data : 1
HKEY_CURRENT_USER\Software\Microsoft\Windows\CurrentVersion\Policies\Explorer\DisallowCpl
Value Name : 1
Value Type : String Value
Value Data: hdwwiz.cpl
HKEY_CURRENT_USER\Software\Microsoft\Windows\CurrentVersion\Policies\Explorer\DisallowCpl
Value Name : 2
Value Type : String Value
Value Data: appwiz.cpl
Some Control Panel applets short cuts
Accessibility Option - access.cpl
Add Hardware - hdwwiz.cpl
Add Remove Programs - appwiz.cpl
Adobe Gamma - Adobe Gamma.cpl
Automatic Updates - wuaucpl.cpl
Bluetooth Configuration - btcpl.cpl
Time & date - timedate.cpl
Display - desk.cpl
Game Controllers - joy.cpl
Internet Options - inetcpl.cpl
Mouse Properties - main.cpl
Network Setup Wizard - netsetup.cpl
Phone and Modem Options - telephon.cpl
Power Options - powercfg.cpl
Regional and Language Options - intl.cpl
Sounds and Audio Device Properties - mmsys.cpl
System properties - sysdm.cpl
User Accounts - nusrmgr.cpl
Windows Firewall - firewall.cpl
****************************************************************
Restrict Computer Management
HKEY_CURRENT_USER\Software\Policies\Microsoft\MMC\{58221C67-EA27-11CF-ADCF-00AA00A80033}
Value Name : Restrict_Run
Value Type : String Value
Value Data: 1
****************************************************************
Enable or Disable Task Manager
HKEY_CURRENT_USER\Software\Microsoft\Windows\CurrentVersion\Policies\System
Value Name : DisableTaskMgr
Value Type : Dword Value
Value Data: 1 (disable) 0 (enable)
****************************************************************
Enable or Disable Comman prompt
HKEY_CURRENT_USER\Software\Microsoft\Windows\CurrentVersion\Policies\System
Value Name : DisableCMD
Value Type : Dword Value
Value Data: 1 (disable) 0 (enable)
****************************************************************
Enable or Disable Registry Editor
HKEY_CURRENT_USER\Software\Microsoft\Windows\CurrentVersion\Policies\System
Value Name : DisableRegistryTools
Value Type : Dword Value
Value Data: 1 (disable) 0(enable)
****************************************************************
Start Menu Restrictions for User
HKEY_CURRENT_USER\Software\Microsoft\Windows\CurrentVersion\Policies\Explorer
Start Menu Restrictions for Computer
HKEY_LOCAL_MACHINE\Software\Microsoft\Windows\CurrentVersion\Policies\Explorer
Remove Recent Documents menu form startmenu
Value Name : NoRecentDocsMenu
Value Type : Dword Value
Value Data: 1 (value data: 0 to reset)
Clear Recent Documents on Exit
Value Name : ClearRecentDocsOnExit
Value Type : Dword Value
Value Data: 1 (value data: 0 to reset)
Remove Recent Documents History
Value Name : NoRecentDocsHistory
Value Type : Dword Value
Value Data: 1 (value data: 0 to reset)
Remove Windows XP Style Starmenu
Value Name : NoSimpleStartMenu
Value Type : Dword Value
Value Data: 1 (value data: 0 to reset)
Remove Startmenu Common Groups
Value Name : NoCommonGroups
Value Type : Dword Value
Value Data: 1 (value data: 0 to reset)
Remove Mydocuments on startmenu
Value Name : NoSMMyDocs
Value Type : Dword Value
Value Data: 1 (value data: 0 to reset)
Remove Mymusic on startmenu
Value Name : NoStartMenuMyMusic
Value Type : Dword Value
Value Data: 1 (value data: 0 to reset)
Remove Mypictures on Startmenu
Value Name : NoSMMyPictures
Value Type : Dword Value
Value Data: 1 (value data: 0 to reset)
Remove My Favorites on startmenu
Value Name : NoFavoritesMenu
Value Type : Dword Value
Value Data: 1 (value data: 0 to reset)
Remove My Network places on startmenu
Value Name :NoStartMenuNetworkPlace
Value Type : Dword Value
Value Data: 1 (value data: 0 to reset)
Remove Network Connections from startmenu - settings
Value Name : NoNetworkConnections
Value Type : Dword Value
Value Data: 1 (value data: 0 to reset)
Remove Help form startmenu
Value Name : NoSMHelp
Value Type : Dword Value
Value Data: 1 (value data: 0 to reset)
Remove Run from startmenu
Value Name : NoRun
Value Type : Dword Value
Value Data: 1 (value data: 0 to reset)
Remove Find form startmenu
Value Name : NoFind
Value Type : Dword Value
Value Data: 1 (value data: 0 to reset)
Remove Logoff from startmenu
Value Name : StartMenuLogoff
Value Type : Dword Value
Value Data: 1 (value data: 0 to reset)
Restrict Taskbar properties
Value Name : NoSetTaskbar
Value Type : Dword Value
Value Data: 1 (value data: 0 to reset)
Remove user name in startmenu
Value Name : NoUserNameInStartMenu
Value Type : Dword Value
Value Data: 1 (value data: 0 to reset)
Remove Installed programs form startmenu (only from startmenu link)
Value Name : NoStartMenuMorePrograms
Value Type : Dword Value
Value Data: 1 (value data: 0 to reset)
Remove Startmenu
Value Name : NoClose
Value Type : Dword Value
Value Data: 1 (value data: 0 to reset)
****************************************************************
Add or Remove Programs Restrictrions (Control Panel Applet)
HKEY_LOCAL_MACHINE\Software\Microsoft\Windows\CurrentVersion\Policies\Uninstall
Restrict Add Remove Programs in Control Panel
Value Name : NoAddRemovePrograms
Value Type : Dword Value
Value Data: 1 (value data: 0 to reset)
Remove Change or Remove porgrams page
Value Name : NoRemovePage
Value Type : Dword Value
Value Data: 1 (value data: 0 to reset)
Remove Add programs page
Value Name : NoAddPage
Value Type : Dword Value
Value Data: 1 (value data: 0 to reset)
Remove Add/Remove Windows Components page
Value Name : NoWindowsSetupPage
Value Type : Dword Value
Value Data: 1 (value data: 0 to reset)
Remove Add a Program from Cd-rom or floppy disk page
Value Name : NoAddFromCDorFloppy
Value Type : Dword Value
Value Data: 1 (value data: 0 to reset)
Add program from Internet
Value Name : NoAddFromInternet
Value Type : Dword Value
Value Data: 1 (value data: 0 to reset)
Add Program from Network
Value Name : NoAddFromNetwork
Value Type : Dword Value
Value Data: 1 (value data: 0 to reset)
Remove choose program page
Value Name : NoChooseProgramsPage
Value Type : Dword Value
Value Data: 1 (value data: 0 to reset)
****************************************************************
Display Properties Restrictions
HKEY_LOCAL_MACHINE\Software\Microsoft\Windows\CurrentVersion\Policies\System
Remove Display Background page
Value Name : NoDispBackgroundPage
Value Type : Dword Value
Value Data: 1 (value data: 0 to reset)
Remove Screensaver page
Value Name : NoDispScrSavPage
Value Type : Dword Value
Value Data: 1 (value data: 0 to reset)
Remove Appearence page
Value Name : NoDispAppearancePage
Value Type : Dword Value
Value Data: 1 (value data: 0 to reset)
Remove Settings page
Value Name : NoDispSettingsPage
Value Type : Dword Value
Value Data: 1 (value data: 0 to reset)
Restrict Display properties
Value Name : NoDispCPL
Value Type : Dword Value
Value Data: 1 (value data: 0 to reset)
Restrict Desktop controls
Value Name : NoDesktop
Value Type : Dword Value
Value Data: 1 (value data: 0 to reset)
****************************************************************
Internet Explorer Internet Options Restrictions
For User Account
HKEY_CURRENT_USER\SOFTWARE\Policies\Microsoft\Internet Explorer\Control Panel
For Computer
HKEY_LOCAL_MACHINE\SOFTWARE\Policies\Microsoft\Internet Explorer\Control Panel
Remove General Tab from Internet Options
Value Name : GeneralTab
Value Type : Dword Value
Value Data: 1 (value data: 0 to reset)
Remove Security Tab from Internet Options
Value Name : SecurityTab
Value Type : Dword Value
Value Data: 1 (value data: 0 to reset)
Remove Content Tab from Internet Options
Value Name : ContentTab
Value Type : Dword Value
Value Data: 1 (value data: 0 to reset)
Remove Connection Tab from Internet Options
Value Name : ConnectionsTab
Value Type : Dword Value
Value Data: 1 (value data: 0 to reset)
Remove Program Tab from Internet Options
Value Name : ProgramsTab
Value Type : Dword Value
Value Data: 1 (value data: 0 to reset)
Remove privacy Tab from Internet Options
Value Name : PrivacyTab
Value Type : Dword Value
Value Data: 1 (value data: 0 to reset)
Remove Advance Tab from Internet Options
Value Name : AdvancedTab
Value Type : Dword Value
Value Data: 1 (value data: 0 to reset)
****************************************************************
Hide & Restrict Computer Drives
Drive restrictions for User Accounts
Restrict Drives
HKEY_CURRENT_USER\Software\Microsoft\Windows\CurrentVersion\Policies\Explorer
Value Name : NoViewOnDrive
Value Type : Binary Value
Value Data: 01 00 00 00
Hide Drives
HKEY_CURRENT_USER\Software\Microsoft\Windows\CurrentVersion\Policies\Explorer
Value Name : NoDrives
Value Type : Binary Value
Value Data: 01 00 00 00
Drive Restrictions for Computer
Restrict Drives
HKEY_LOCAL_MACHINE\Software\Microsoft\Windows\CurrentVersion\Policies\Explorer
Value Name : NoViewOnDrive
Value Type : Binary Value
Value Data: 01 00 00 00
Hide Drives
HKEY_LOCAL_MACHINE\Software\Microsoft\Windows\CurrentVersion\Policies\Explorer
Value Name : NoDrives
Value Type : Binary Value
Value Data : 01 00 00 00
Drives using hexa decimal values A=1, B=2, C=4, D=8
****************************************************************
Pen drive Write Protect Using registry Value
HKEY_LOCAL_MACHINE\SYSTEM\CurrentControlSet\control\StorageDevicePolicies
Value Name : WriteProtect
Value Type : Dword Value
Value Data: 1 (value data: 0 to reset)
****************************************************************
Usb Storage Device Enable or Disable
Disable USB
HKEY_LOCAL_MACHINE\SYSTEM\CurrentControlSet\Services\USBsTOR
Value Name : Start
Value Type : Dword Value
Value Data : 4
Enable USB
HKEY_LOCAL_MACHINE\SYSTEM\CurrentControlSet\Services\USBsTOR
Value Name : Start
Value Type : Dword Value
Value Data : 3
****************************************************************
 Right click my computer- properties.
 Select computer name tab.
 Select domain option and type your domain name after it will ask user name and password.
 Type server administrator user name and password.
 Click ok.
 Click ok.
 After you can see computer name with domain name and domain name. Click apply and ok button.
 Click yes.
 After restart the above dialog box appears, you press ALT
 Now you can log in to domain after typing user name and password by clicking log on to drop down box and selecting your domain name click ok.
WDS - Windows Deployment service
Posted by K. Ezhil Kumar | | Category:
Windows 2003 Server
|
0
comments
Install Windows Deployment Service
Go to Control panel - Add or Remove programs - select Add/Remove Windows Components

Select Windows Windows Deployment Service.

Restart your computer after installing

****************************************************************
Configuring Windows Deployment Service.
After restart Go to Start - All programs - Administrative Tools - Windows Deployment Service.

Right click on Server and click Configure server.

Windows Deployment Service configuration wizard shows requirements for wds. Click Next.

Select Remote install folder location and click Next.

Click Next.
Note: if you want DHCP option 60 you can select.

In PXE server initial settings window whatever you want you can select and click Next.

If you configure now you can check add images to the windows deployment server now check box or Remove that check box and click Finish.

Now successfully configured, you can view WDS windows like this.
****************************************************************
How to Add Boot images in WDS
Image type : .WIM (Windows Imge)
You can use the Boot.wim from the installation Windows Vista, Windows 7, windows 2008server DVD (in the \Sources directory).
The Boot.wim contains Windows PE and the Windows Deployment Services client
(which is basically Windows Vista Setup.exe and supporting files).

Right click on Boot Images in WDS.

In the Add boot image wizard browse to choose the default boot image (Boot.wim) located on the Windows 7 DVD, in the \Sources directory, click open and click Next.
Note : I used windows 7 boot image.

In the image name box You can rename whatever you want.
Click Next

Click Next.

Click Finish.
****************************************************************
How to Create Capture Boot images.

Choose Boot Images, Right click on already added boot image and select Create Capture Boot image


The next windows shows image capture progress, after complete click Finish
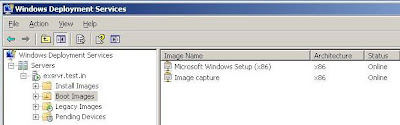
After image capture you can see captured image in boot image section like this
****************************************************************
How to Add Install Images in WDS
Image type : .WIM (Windows Imge)
You can use the Install.wim from the installation Windows Vista, Windows 7 (in the \Sources directory).

Right click on Instll Images in WDS.

Type Image group name and click Next.

Open Install.Wim file from windows vista or windows 7 DVD (\source) or open file where you saved.

Select what you want and click Next.

Click Next.

Image capture progress going on....

Click Finish

After image capture you can see captured image in Install image section like this
****************************************************************
Creating custom Install Images
Requirements:
1. sysprep tool
On the Windows xp CD (in the \Support\Tool) Note : If you capture in windows vista use Vista Sysprep tool.
2. PXE Boot option in client computer
3. At least 512MB of RAM

Open DEPLOY.CAB file in Xp cd (\SUPPORT\TOOLS\DEPLOY.CAB)
Copy all the contents to C:\sysprep folder


Type the command c:\sysprep> sysprep -mini - reseal - reboot
(or)
Use the following
Double click the syspre.exe

Click OK

Select Use Mini Setup option, Shut down or restart and click Reseal

Click OK

Sysprep is preparing ...........

After Shutdown or restart
Enable PXE boot in BIOS. Press F12 button computer to boot network

IF you configured WDS properly You can able to view the boot images at the network boot time on the client computer.

Loading file from server.............

Click Next

If you ran sysprep tool Image captured wizard shows only C:\. Select C:\

Type Image name,description and click Next.

On the Image Capture Destination page, click Browse select the location where you want to store the captured image.
(or)
Select Upload image to WDS server. Type Server name or IP address, Select Image group name which group you want to store and click Next

Capturing process going on

Click Finish
****************************************************************
Installing an install image
Enable PXE boot in Client computer. Press F12 button computer to boot network
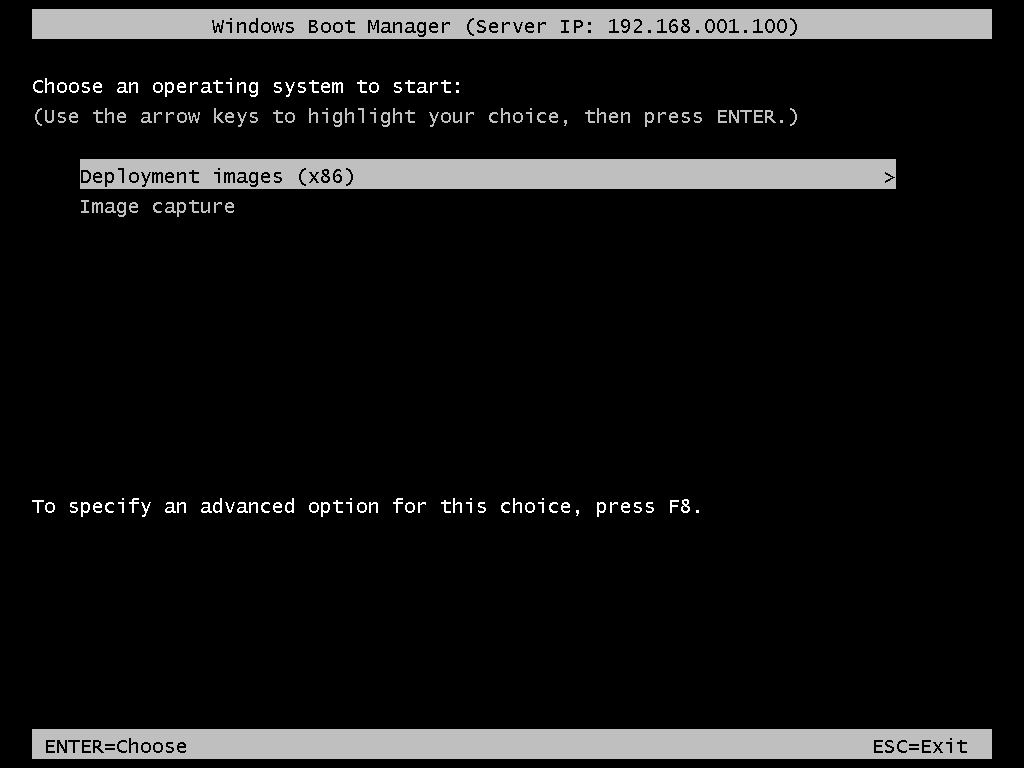
Select Deployment image


Click Next

It will ask user name and password type domain\user name and password
click ok

Select which one you want Click Next

If you want format and resize partition click advance options


Setup is installing windows

When installation is complete, the computer will restart and Setup will continue.
Need more information use following links
Need more information use following links
Step by Step Guide for WDServices in Windows Server 2008 Click here to download
****************************************************************
Subscribe to:
Posts (Atom)